
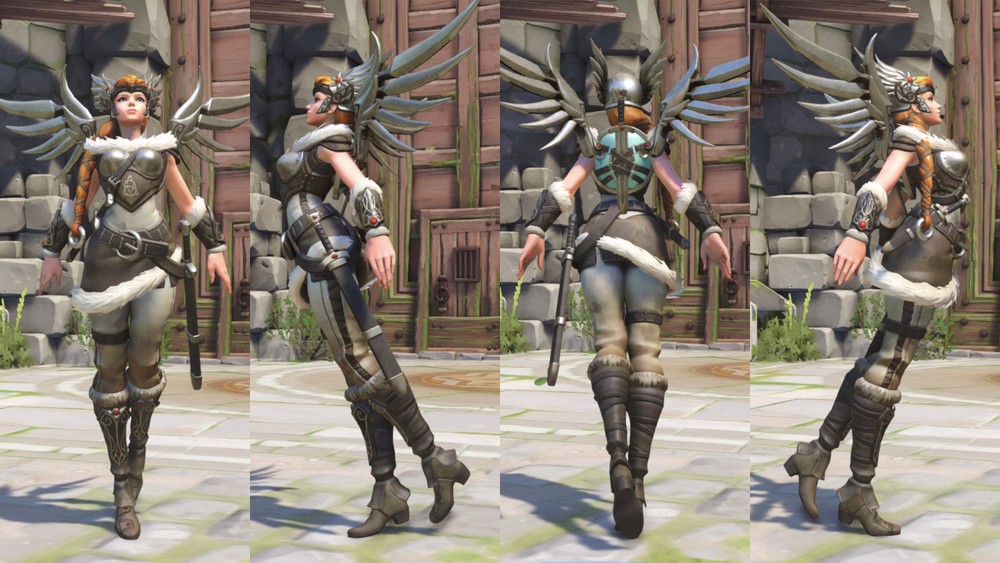
Sigrun Mercy from Overwatch
“Till Valhalla!”
Mercy was one of the first heroes I picked up in Overwatch, and definitely the first I shelled out in-game currency for for a skin (and then again for Witch Mercy… but that’s a separate issue).
After completing my Arcade Riven earlier this year, I was waiting for inspiration for my next cosplay endeavor. After a series of Overwatch themed mini-crafts, it seemed appropriate for my next cosplay to be a hero.
In an effort to continuously challenge myself to learn new techniques and materials, I’ve tried to have my newest cosplay projects up the difficulty level from my previous ones. Sigrun Mercy was no different, with the addition of more complicated armor pieces and the fact that I wouldn’t be able to cheat my way through patterning fitted clothing by relying on stretchy knit fabrics…
It also helped that I decided really early on to bypass making her actual wings by converting them into a con-friendly backpack :)
All components of the cosplay were made by me, with the exception of the shoes :D
MATERIALS
Fabric Elements
- Outer Top (brown microsuede, matching knit lining fabric, matching zipper, red buttons, fur trim, silver trim, snap tape)
- Pauldrons (brown microsuede, matching knit lining fabric, craft batting, snap tape)
- Inner Top (beige knit fabric, brown knit fabric, matching bias tape, grommets, leather lace)
- Skirt (brown microsuede, matching knit lining fabric, matching invisible zipper, fur trim, Velcro)
- Leggings (beige knit fabric, brown knit fabric, matching bias tape, elastic)
- Arm Bracers (brown microsuede, matching knit lining fabric, matching bias tape, craft batting, fur trim, sew-on snap closures)
- Leg Bracers (brown microsuede, matching knit lining fabric, matching bias tape, craft batting, fur trim)
- Belt (brown microsuede, heavy interfacing, belt buckle, Velcro, snap tape)
- Swords (brown microsuede, grey canvas, heavy interfacing, matching cotton lining fabric, acrylic rod, red buttons, snap tape)
Armor Elements
- Arm Bracers, Leg Bracers (craft foam, Worbla, D-Rings and Velcro, acrylic gems, wood glue, paint)
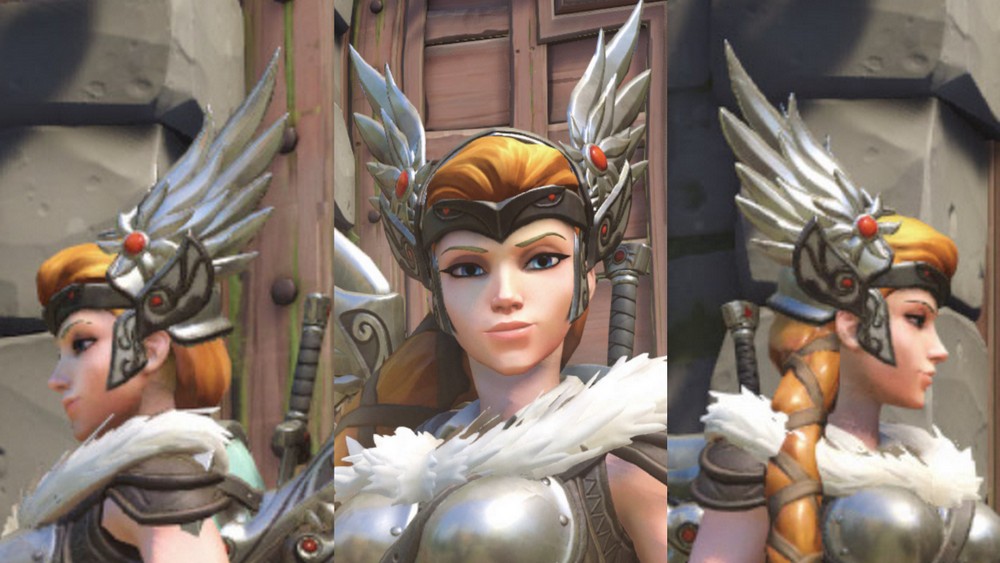
- Helm (craft foam, Worbla, acrylic gems, wood glue, paint, helmet foam to fit)
- Breastplate (craft foam, Worbla, Velcro, wood glue, paint)
AccesSories
- Valkyrie Suit Wings Backpack (check out my tutorial here)
Outer Top
The idea behind all of my non-knit pieces was to have a microsuede outer shell, and a matching knit lining layer (to both make it easier to have cleaner edges, as well as make it feel more comfortable on the inside).
I first began patterning by creating a plastic-wrap-and-tape mold of my torso, and then cutting a rough pattern from that. I used my knit fabric to create a mock-up for test fitting and pattern adjustment (which was then recycled to be used as the lining layer). The final pattern ended up as one front panel, and two back panel halves (where a zipper could be installed). The top parts of the shoulder straps were left to “fold over” from back to front to match how Mercy’s character model has it shown.

Once the general structure was completed, the remaining decorative elements were added on! A fur trim was sewn around the collar, taking care to use long width stitches and gently pulling out any fur that got trapped under them. Red buttons were added on the top parts of the shoulder straps.

The celtic knot was created by cutting out the design piece-by-piece from silver trim. The pieces were positioned, basted on using fabric glue, and then top-stitched to hold them in place.

The pauldrons were made as pairs of tiny tortillas stuffed with craft batting. Top-stitching was added to serve as both decoration and anchoring for the batting. To keep the pauldrons detachable for washing and traveling ease, snap tape was sewn onto the top side of the pauldrons (and to the underside of the shoulder straps of the outer top).

Velcro was added to the outer top for easy attachment of the breastplate.

Inner Top
The inner top was drafted by roughly tracing a comfortably fitted tank top. The side panel stripes were made by arranging matching strips of bias tape (and then sandwiching the panels between the front and back sides of the top).

For the collar, I followed this tutorial from emmakespatterns to draft the pattern, and then this tutorial from foursquarewalls to attach it. Small grommets were attached to the front placket for the leather lace.
After a good number of test fittings, I noticed that the small grommets were slowly tearing their way out of the fabric. I ended up attaching small pieces of heavy interfacing to the backside of the grommets, and then hand-sewing the grommets in place (so that the grommets and interfacing would sandwich the main fabric of the inner top). Next time, I would probably interface the grommet locations before installing the grommets to prevent this rework from happening again :)

Skirt
The skirt pattern was derived by tracing a similarly structured skirt I owned (and like the outer top, I used my knit fabric to create the mock-up for test fitting). An invisible zipper and Velcro top-closure were added for ease of wear.

The inner panels from the underside of the skirt were made by creating small panels of fabric and hand sewing them to the lining layer of the skirt.

Leggings
I used this tutorial from so sew easy to get the pattern down for my leggings. The side panel stripes were made using an identical method to the one used for the inner top (except this time using thicker bias tape).

The leg belt thing was made using a similar process to my Arcade Riven belt: heavy interfacing covered in fabric, with detailing done using the buttonhole-making feature of my sewing machine. Velcro and hook-and-eye closures were added to help the leg belt lay a bit more flush against my leg.


Arm Bracers
I patterned the bracer by first creating a plastic-wrap-and-tape mold of my forearm, and then transferring it to my patterning paper. The general structure of the bracer was to have an outer layer (with the bias tape stripes), an inner lining layer, and then a layer of craft batting sandwiched in-between.

A fur trim was then added to both sides of the bracer, and then snap closures were carefully positioned and sewn on by hand.

Velcro was added to attach the armored parts of the arm bracers.

Leg Bracers
The leg bracers were pretty similar to the arm bracers, except no plastic-wrap-and-tape mold was used (instead, there was just luck and daring).

The leg bracers were constructed to be able to be pulled on over my leggings. In retrospect they probably should have been a bit looser, but that’s ok ;A;


Belt
The belt was made using a similar process to my Arcade Riven belt.

The swords were made using the same process used when making the sword for my Valkyrie Suit Wings backpack. The only difference here was the addition of sheaths.

The sheaths were composed of an outer layer and an inside lining layer. The outer layer was made by creating a loose tube (enough to fit the swords), with the grey canvas accents sewn on by hand. The lining layer was made with a slightly less loose tube, with fusible interfacing attached to give the sheath some rigidity. Snap tape was used for quick attachments of the sword sheaths to the belt.

Armor – Arm Bracers
The armored part of the bracers was made by first patterning out on craft foam, then slowly massaging Worbla on top using the sandwich method. Unlike my previous attempts at Worbla armor, I choose to do the details in Worbla as opposed to foam. Velcro was attached to the backsides to attach to the fabric arm bracers.

Once the Worbla-ing was completed, the bracers were primed using the wood glue method, primed with black spray paint, hand painted, clear-coated, and then the acrylic gems were attached using hot glue. The acrylic gems were purchased from a local plastics shop, with the backsides painted with nail polish.

ARMOR – Leg BRACERS
The leg bracers were created using an identical process to the arm bracers.


ARMOR – Helm
The helm was possibly the most complicated Worbla piece I’ve made to date. The main body of the helm was made from a plastic-wrap-and-tape mold of a wig head (with my Arcade Riven wig on it to simulate the presence of hair). The “wings” were slowly patterned out using paper mock-ups (and then worn around to see just how large and unwieldy they would be).

All components of the helm were made separately, then stuck together using the adhesive power of Worbla. Priming and painting were done using the same techniques as the arm and leg bracers.
Once the helm was painted, it was adjusted to fit by adding helmet foams to the inside.

ARMOR – Breastplate
The breastplate was my first attempt with using Worbla’s Black Art, and it was immediately followed by purchasing more giant sheets.

The cups were made by molding a double layer of Worbla’s Black Art over adequately sized spheres. The outer “figure 8” shape was a sandwiched piece of craft foam. The cups were cut down to size, massaged into the “figure 8” shape, and then decorative rivets added using tiny scrap pieces of Worbla. Velcro was attached to the inside of the breastplate to attach it to the outer top.

Retrospective
General lessons learned from this time around:
- General Cosplay Construction One thing I wanted to make sure of this project, was to limit the amount of elements that needed to be attached by safety pins. I made it a point to incorporate more Velcro, snap closures, snap tape (which I learned is the best thing ever), to make the cosplay stay together more with its inherent structure (as opposed to needing the help of tape and safety pins).
- Armor Attachment (I feel) has gotten a bit better since my previous cosplay projects. This time around especially, I grew to appreciate the ease of Velcro and how it has a surprisingly greater amount of hold than I previously thought.
- Worbla’s Black Art is wonderful and I need to use this everywhere. The only difficulty I encountered with this material was that I didn’t own anything on-hand to prime the surface. Thankfully the only armored portions I had that used Worbla’s Black Art were the breastplate cups and (though left unprimed) the final painted product looked pretty decent!
And of course, I was pretty happy that I was able to continue my “trend” of plush weaponry (with a reasonable usage of my Valkyrie Suit Wings backpack!)

You must be logged in to post a comment.